
We get tons of e-mails asking "How do you customize Kicks?", "How'd you get started?", "Where did you find out how to paint shoes?"...and things like that--so we decided it would be a good look to create a blog that will show you the basics of how we do what we do.
Most of our knowledge came from computer research, and well just getting our hands dirty so to speak. I have never been one to withold info I've learned from the next man (as I have discovered many shoe customizers seem to do). Painting and customizing shoes is not rocket science, its just a patient art that does take a lot of practice...If another artists comes up and takes my business, than cool, whatever, more power to them.
Anyway, I got real interested in sneaker customizing after I saw an interesting art show put on by Houston graff legends Aerosol Warfare. They had an art show that compiled custom kicks (not wearable) done by many of the world's top graffiti writers. I was blown away with how much a little paint and know how could transform every day stompers to one of a kind pieces of art.
So I did a little research and learned the basics of how to paint a wearable pair of custom kicks ...20 or 30 plus pairs later, the rest is history.
For this "How To Paint Kicks" blog, we were working on yet another pair for MC extarordinaire's Phranchyze 1. He wanted a "simple" color change that would mimick an old school Luchadors wrestling boots. Cool. We were working with the popular Nike Air Force 1's.
Air Force 1's are great for color changes, however, the amount of sections on these and most other Nikes, makes it more difficult to get detailed with illustrations and such. If you are looking to do a "painting" on a pair of kicks and are new to the game, I suggest Adidas Stan Smiths, or something like that with a lot of open leather and minimum sections.
Here's what you need: Acetate (Nail Polish Remover), Cotton Swabs, Q-tips, Fine line brush, medium line brush, Professional leather paint (mostly can only be found online), Soft Painters Tape, Acrylic finisher (Sealant), Airbrush (our preference) and about 15 hours.

Step 1:
Take off laces and clean shoe with cotton balls dipped in nail polish remover. This is THE MOST IMPORTANT step in customizing. As you rub the doused cotton balls over the shoe, you will notice that there is a clear build up that comes off the shoe-thats the idea. Essentially, this step is to remove the "clear coat" that most manufacturers spray on their shoes to protect them. It's a must to remove this so that the paint will bond directly to the leather as opposed to the clear coat.
If the clear coat is left , chances are that the paint will crack after some wear.
I like to go over the shoe at least 3 good times. If you want to go that extra step, use doused q-tips to get into the hard edges and sections.
Let dry/evaporate for at least 30 minutes before painting.
NOTE: If you are painting on colored leather, be careful and rub lighly, as you may go too far and discolor some parts of leather, you may not be planning on painting over.

Step 2:
We prefer to airbrush most fills so that there are minimum brushmarks to be seen. The trouble with airbrushing is that you always have to keep in mind overspray and underspray; this can prove particularly difficult especially when colors are mixed as opposed to straight out of the bottle.
In order to keep cleanup of the over/under spray to a minimum- the masking off of the shoe should be pretty exact. Mofoz' Airica helped mask these off, as its a good idea to use fingernails to wrap tape around edges of the sections...in my early days I used a flat razor to bend the tape over the edges of the sections and tuck it under the section.
This is a tedious process, as you will need to tear and apply tape for hours sometimes, just to reapply to different sections after the first round of paint.
Use Scotch "soft" painters tape, dont buy the cheap stuff- it will save you a lot of time in the long run. The soft tape can be applied to paint 24 hrs after the first painting and will not peel the paint off when removed. The cheap stuff probably will.
NOTE: You can also use the soft painters tape for small stencils. This is really good for elaborate and detailed logos.

Here are the Air Force 1's ready for paint ...note the clean surface. important.


Here is what the shoes look like after 3 light coats of airbrushing. Whether you are airbrushing or handpainting, use multiple thin coats. (allow paint to dry for at least an hour between coats)
Using thin coats will make sure the paint dries quicker, and will ensure that the paint will not crack when worn.

Carefully remove the tape, as sometimes the tape will remove small spots of paint. The more careful you are at this step, the less cleanup you will have to do afterwards.

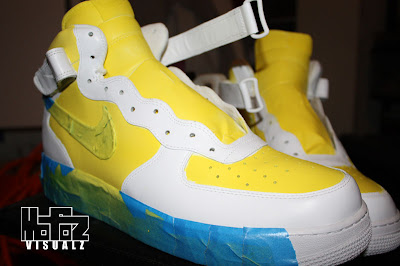
Here is a picture of the tape up of the yellow section so that we can apply the blue paint.


STEP 3: The Details
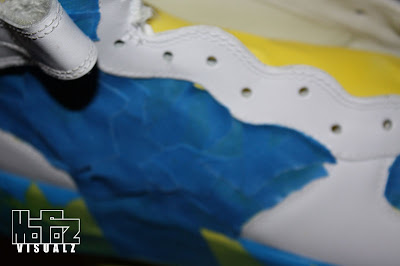
This is a picture of after the blue has been sprayed and dried.
At this point all is left is the details, this is what makes a custom pair of AF 1's go from "eh", to"damn!!! Take notice that there are still small parts around where the sneakers were masked that need to be painted, as well as the inside edges of the sections that need to be painted /or cleaned up from overspray.
Use the fine line brush and be very patient when doing this-you do not want to get paint on places where its not supposed to be. I used to actually use a flat razor to "paint" the edges, also, but since have gotten a lot more proficient with a fine line brush. If you happen to get paint where you dont want- quickly use a clean rag or q-tip with water or nail polish remover on it and carefully dab the paint.


This is me painting the section around the tongue blue to match the other sections. Keep in mind that these details is what will set your kicks apart from the norm, and will give it a more "factory" feel.
Step 4: Sealant
The sealant will help to seal your paint to the leather, as well as ad a nice gloss to your paint. I generally will airbrush at least 3 coats of sealant in 45 minute intervals. If you want your shoes glossier, you can spray/paint more coats. The Angelus brand sealant I use comes in 3 different choices: low, mid and high gloss.
Again, you can paint the clear sealant on, but we choose to airbrush to minimize brushstrokes.
After the sealant is applied to your custom kicks, the paint will be protected. If they get dirty, they are easier to clean than if they were brand new. Just take soap and water on a clean rag and give it a once over.
Allow the sealant to dry for at least 24-48 hours before wearing.
Step 5: Stepping out
Check out Phranhcyze's "Customized Kicks" song at http://www.mofozvisualz.com to get some inspiration. enjoy.


The "P" on these kicks were handpainted. We would have usually stenciled it out and airbrushed, however due to time constraints they were hand painted.


11 comments:
Hey man,
love the steps on how to customize kicks..
i got a couple questions tho
does the air brush peel off?
also, do you prep your shoes first and if you do, how much - all the way down to the gray on the af1's?
much appreciated, thanks
just saw this--maybe too late . but heres the answers to your q's...the airbrush doesnt peel off...you need to use professional leather paint...most popular brand is angelus.
i prep the shoes with acetate and cottonballs
I was wondering how did you paint the words on there and can I also put designs with that paint?
Hey thanks for the awesome instructions ! if you don't have a airbrush system can you just use a paint brush ?
I'm trying to get into doing customs, what kind of airbrush would you recommend and what kind of paint works for synthetic material?
I am just getting into customizing and was wondering if you suggest any type of airbrushes or supplies. Also, can you spray acrylic paint from the airbrush without adding thinner. Thanks.
U are a Pioneer 4 sure!! Is it possible to change plastic pieces like on the retro 4 Jordan grey triangle or saucony grid SD 2?? If so, how would u customize thone plastic pieces?? Thx....also, if ur not an artist, BC I can't draw a stick figure, but I'm OCD with neatness or cleanliness. But I'm not sacrificing KiX BC of my stubbornness
U are a Pioneer 4 sure!! Is it possible to change plastic pieces like on the retro 4 Jordan grey triangle or saucony grid SD 2?? If so, how would u customize thone plastic pieces?? Thx....also, if ur not an artist, BC I can't draw a stick figure, but I'm OCD with neatness or cleanliness. But I'm not sacrificing KiX BC of my stubbornness
Nice job ! Thank you for step by step instruction !
Where can I get the all different colors?
is there any specific brand of airbrush that should be used or is any kind good
Post a Comment